Detail Dashboard: Manage Projects and Categories in Microsoft Outlook
The Detail Dashboard window shows messages, notes, tasks, appointments, contacts, and attachments by Project or tasks by Context Category.
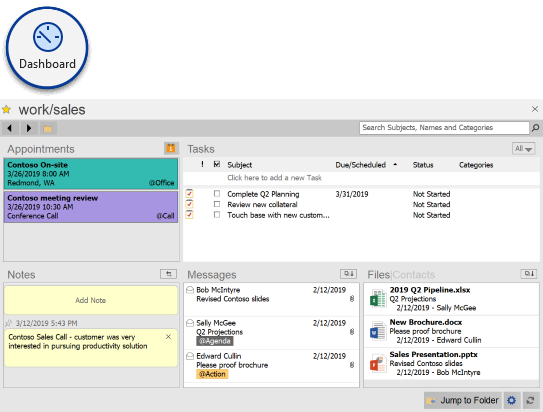
Projects
To open a Project in the Detail Dashboard, click on a Project name in the Summary Dashboard list, and the Project Detail window will automatically open. This window will automatically float above the Outlook window. To change to a different Project, click on a different Project name in the Summary Dashboard, and the window will change to the selected Project.
To close the Project Detail window, either click the X button on the top right, or press the keyboard Esc key.
Navigation and Search Bar
The left and right arrow buttons in the bar switch the current Project up and down in the displayed Projects in the Summary Dashboard, while the Folder button allows one to open any Project. The search box filters the contents of the current view, using the Subject, Name, Project and/or the Category fields, depending on the current view of the Dashboard.
Appointments
This section displays the Appointments that belong to a Project. Double click on an item to open the full Appointment item window. The appointments will be displayed with their Outlook categories and color if applicable.
Project Notes
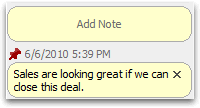 Click
Add Note in the Yellow bubble at the top of the Project Summary to add a
note about the project:
Click
Add Note in the Yellow bubble at the top of the Project Summary to add a
note about the project:
- Use CTRL-ENTER to add a new line.
- Press ENTER to complete the note.
- Notes are listed in descending date order. Use the pin icon
 to
pin notes to the top of the list.
to
pin notes to the top of the list. - Click X to delete a note.
- Press the button with the arrows to the right of the Notes caption to print Notes or copy Notes to the clipboard
Tasks
This section displays all Tasks with the current Project assigned to them. This section operates in the same manner as the Organizer, allowing for sorting by columns, right click actions, in-place editing of task fields, and a new task entry field at the top. When adding a task from the Detail dashboard, by default the current Project or Category is assigned to the task.
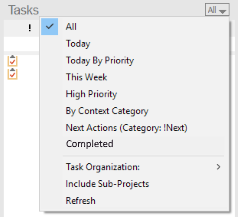
Options are listed in the menu on the top right of the Task area:
- Various views can be selected, such as All, Today, This Week, Completed, etc.
- Task Organization allows Tasks to be arranged by Due Date or Start Date
- Include Sub-Projects toggles whether to view tasks only for the current Project (i.e. MainProject) or the current Project and all sub-projects of the current Project (i.e. MainProject/SubProject).
Messages
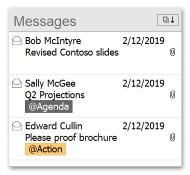
The Messages pane shows recent emails for the Project that reside in the Inbox, Sent Items or Project folder. When more messages are available to display, a notification will be shown that can be selected to load older messages.
- Double-click a message item to open the message in Outlook.
- Highlight a message and right click to perform actions such as reply, forward, delete or create a task or appointment.
- Sort the message listing by clicking the sort icon.
* The Messages pane is not available when ClearContext is configured to file all Project emails to a single folder
Files
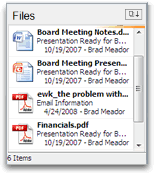
The Files pane shows all attachments found in the messages that reside in the Project folder. For attachments that appear in more than one message, click the more button to see a list of all emails that contain the file.
Perform the following actions from within the Files pane:
- Double-click a file to open the most recent message to contain that attachment.
- Highlight message(s) and right click to open the message containing the attachment, open the attachment itself or forward or save the selected files.
- Sort the file listing by clicking the sort icon.
* The Files pane is not available when ClearContext is configured to file all Project emails to a single folder
Contacts
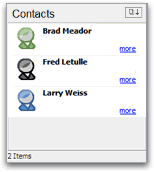 The Contacts pane shows all Contacts in the From: fields for
messages that appear in the Messages pane. The colored contact
icon indicates the assigned priority for the contact. For contacts
that exist in the Outlook address book, click more to show
additional contact details. For contacts that do not exist in the
Outlook address book, click create to
quickly add a record for the current sender.
The Contacts pane shows all Contacts in the From: fields for
messages that appear in the Messages pane. The colored contact
icon indicates the assigned priority for the contact. For contacts
that exist in the Outlook address book, click more to show
additional contact details. For contacts that do not exist in the
Outlook address book, click create to
quickly add a record for the current sender.
Perform the following actions from within the Contacts pane:
- Double-click a contact to open the contact record. Adjust priority from here to improve Outlook prioritization.
- Highlight contact(s) and right click to email or set up an appointment with the group, export contacts to a file or create a distribution list.
- Sort the contact list by clicking the sort icon.
* The Contacts pane is not available when ClearContext is configured to file all Project emails to a single folder
Other Project Actions
- Click the Favorite Icon on the top left of the screen to toggle favorite status on or off.
- Click on the Jump to Folder button have Outlook navigate to the Project folder location where emails are stored.
- Click the Gear Icon to access the Move Project function
- Click on the Refresh Icon to reload the information in the window
Context Categories
To open a Context Category in the Detail Dashboard, click on a category name in the Summary Dashboard list, and the Context Category Detail window will automatically open. This window will automatically float above the Outlook window. To change to a different Category, click on a different Category name in the Summary Dashboard, and the window will change to the selected Category.
To close the Context Category Detail window, either click the X button on the top right, or press the keyboard Esc key.
The Category Detail window displays all tasks with the associated Context Category assigned to it (categories with a special character in front of the name - @, !, *, etc.). The task actions and options operate the same as the Tasks section in the Projects mode above.