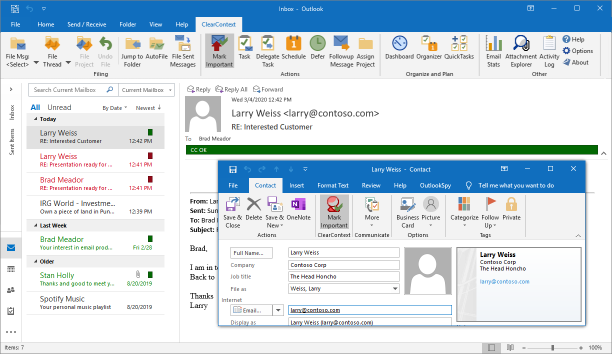
Mark Important: Highlight Email From Important Contacts in Outlook
Marking Important emails is an optional ClearContext feature that can be enabled in the ClearContext->Options screen. When enabled, ClearContext marks messages as known or important when the sender of the email is found in your Outlook Contacts. Contacts that have Mark Important enabled have emails marked with the CC VIP tag and contacts that exist but do not have Mark Important enabled are marked with CC OK. Individual email conversations can also be marked important via the Mark Important button on the toolbar.
CC VIP
The Mark Important button is available when opening Outlook contacts. By default, email received from contacts set as important are marked with category CC VIP and color-coded red Manually mark/un-mark a message as a VIP using the Mark Important button. This will automatically adjust the contact priority and future messages will reflect the change.
CC OK
All messages from known senders are marked with category CC OK and color-coded green These include messages from contacts that are in your address book - but not marked important - and messages from contacts that are not in your address book but are replying to conversations that you have already participated in.
Contact Priority
 Also
adjust priority via contact records. Open the contact for an important
sender and press Mark Important. All future messages from
this sender will be designated CC VIP.
Also
adjust priority via contact records. Open the contact for an important
sender and press Mark Important. All future messages from
this sender will be designated CC VIP.
Views
When the appropriate ClearContext view is selected in the Outlook view menu, messages are color coded using Inbox category colors. The ClearContext views can be selected from the Outlook view menu (View > Current View).; There are three views installed during setup:
- ClearContext By Date - messages ordered by received date
- ClearContext Threaded - messages grouped by conversation and ordered by date
- ClearContext Prioritized by Category - messages grouped by category
Options
If you change options below, the views above may no longer color code by priority.

Enable or adjust prioritization options via ClearContext > Options > Misc:
- Prioritize Inbox messages - enable message prioritization
- CC'd to me - enable this option to prioritize messages that you are copied on.
- Category - change category name, color and enable/disable.
- Importance Icon - append the Outlook importance icon to messages according to priority. Note that this priority may also be communicated in message forwards and replies.
- Flag - add a flag or check for each priority. Flagged messages will appear in the To Do List.